File translations workspace
Here you see an overview of all translation projects.
Table overview

- Name. Your chosen project name.
- Job Id (#). An ID number specified by you or our project manager.
- Created. Project creation date.
- Description. Language combination and type of job.
- Job status. An overview of all job statuses can be found here.
- Files. Number of files in the project.
- ExpertCheck. With this button, the files in the project can be sent to our team for review.
- Reworks. A list of AI and human reworks. This is also where new reworks can be added. A human reviewed should also be added through [Add rework].
- Finished. Change the status of a project to finished.
- Role. Your role in the project.
- Team. Team to which this project belongs.
- Actions. A list of actions that are available for the project.
Actions
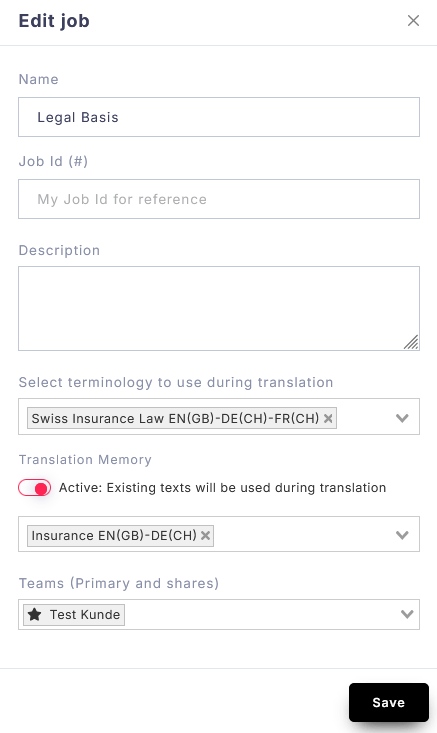
Edit job. Here you can edit the job settings, such as the name job ID, and description, and add or remove resources like termbases or translation memories.
Manage workflows. Here you can see what workflows have already been completed or start a new workflow.
Show configuration. Detailed information about the project, such as attached resources, translation memory configurations, and available workflows.
Show analysis report. Detailed analysis of project word count, repetitions, and matches.
Update translation memories. Update the attached translation memory with the newly translated project.
Download target files.
The file translation workspace is designed to help translators work more efficiently by breaking down text into segments and providing various tools to improve accuracy and consistency. It offers various features to speed up the reviewing and editing of the text segments.
Overview
The file translation workspace contains the following areas:
- the Assistant
- the Navigation bar
- the Information bar
- the Segment table
- the Sidebar
Assistant
The Assistant is an AI-powered virtual helper available in the Sources group of the navigation bar. Click the Assistant button to open a panel on the left side of the screen.
Use the Assistant to:
- Get insights about selected segments of text
- Ask questions or research concepts related to the source content
- Receive general guidance or explanations
Simply select text or enter your query to interact with the Assistant.
The Assistant panel consists of
- the conversation history,
- the message field where you can input your queries and prompts,
- the Assist button,
- the Reset chat button,
- the Browse prompts button,
- the Send to editor button, and
- the Send message button.
Navigation bar
The navigation bar contains buttons grouped by function. Each group provides access to related features and tools.
Help group
The Help group features the Help button, leading you to KITT::Hub’s documentation.
History group – Undo | Redo
The History group provides the following options:
- Undo: Reverses the most recent action
- Redo: Restores an action that was undone
You can step backward or forward through your recent actions in sequence.
Note: Undo and redo actions apply only to segments. Select the relevant segment before using these options.
Clipboard group – Copy | Paste | Cut
he Clipboard group provides standard text editing functions:
- Select the text you want to cut or copy.
- Click Cut or Copy (or press Ctrl+X / Ctrl+C).
- Place the cursor where you want to insert the text.
- Click Paste (or press Ctrl+V) to insert the copied or cut text.
When you copy text, it remains in its original location after being pasted. When you cut text, it is removed from its original location once pasted.
View group – Search & Replace | Filter | Tag display | Whitespaces
The View group provides tools to search, replace, and filter content, as well as control the visibility of tags and whitespace characters.
Search/Replace inside segments
Use Search & Replace to find and modify text in source or target segments.
To open this feature, click Search/Filter in the View group, or press Ctrl+F.
Components:
- Search box: Enter the text to find
- Replace box: Enter the replacement text
- Clear button: Clears the search field
- Navigation arrows: Move between matches
- Replace: Replaces the current match
- Replace All: Replaces all matches at once
- Configuration: Access search options
- Add Filter: Limit the scope of the search
Press Enter after changing search criteria to apply it.
Note: The search is case sensitive by default. Disable this in the configuration settings behind the configuration wheel if needed.
Search options
Click on the configuration wheel to choose from the following search options:
- Case insensitive: Ignores letter casing.
- Use regex (regular expressions): Enables regular expressions in the search and replace fields (PHP 8+ syntax).
- Source only: Searches only source segments.
- Target only: Searches only target segments.
Replacing text
- Enter the text to find in the Search box
- Enter replacement text in the Replace box
- Choose:
- Replace to update one occurrence at a time
- Replace All to update all matches
Tip: Verify that the replacement text is correct in all contexts before using Replace All.
Filter options
Filters help you focus on specific segments.
Filtering segments helps with tasks like making sure there are no untranslated segments in a file, finding repeated terms, or locating specific words in different segments.
- Click on Search/Filter.
- Click Add Filter located on the right side of the Search & Replace section. The following options will be displayed:
Available filters:
-
-
- Not locked: Displays only unlocked segments that are available for editing.
- Not confirmed: Shows only unconfirmed segments.
- Has terminology: Contains termbase matches.
- Repetitions – First occurrences: Displays only the first occurrences of repeated segments.
- Repetitions – Duplicates: Repeated segments excluding the first instance.
- Fuzzy match (%): Filters segments based by similarity to previously stored translations in the translation memory (TM). Choose a percentage range of fuzzy matching by entering numbers (0–100%) into the two boxes.
- MTQE score (%): Filters segments by machine translation quality estimation (MTQE) score. Choose a percentage range of machine translation quality by entering numbers (0–100%) into the two boxes.
-
You can combine multiple filters as needed.
Please let us know if a filter you need is missing: contact@kitt-hub.ch
Tag display
By default, tags are displayed as numbered placeholders with their unique tag IDs. To view the full tag details, hover over it.
You can change how tags are displayed using the Tag display option:
Numbered tags (Default): Shows numbered tags to match source and target tags. Numbering starts at 1 for the document. Hovering with the mouse over the tag reveals additional information.
Small tags: Displays tags in a compact format for improved readability.
Titled tags: Shows tag numbers along with additional descriptive information.
ID tags: Displays tag numbers based on their IDs in the underlying XLIFF file.
Whitespaces
The Whitespaces option makes non-printing characters (such as spaces and non-breaking spaces) visible.
To make spaces visible click Whitespaces in the View group.
This is useful for identifying formatting issues, such as extra spaces. You can combine this with regex search to find patterns like double spaces.
Tags & Symbols group – Copy or remove tags | Symbols
The Tags & Symbols group provides tools to manage tags and insert special symbols in target segments.
Copy tag
The source and target segments need to have the same tags to prevent issues when exporting translated files. You can copy tags from the source to the target segment if they are missing or if you removed them earlier.
- Place the cursor at the desired position in the target segment.
- Click Copy tag.
- Select the tag pair you want to add from the list displayed.
- Place the relevant content inside the newly copied tag pair.
Note: To add paired tags around words, first select the words and then insert the tags all at once in the right spot.
Remove all tags
If the target segment no longer requires the formatting tags from the corresponding source segment, e.g. if the source used superscript tags that the target segment does not need, you can remove the formatting from the entire target segment.
- Select the segment.
- Click Remove all tags.
Remove individual tags
To remove a specific tag place the cursor next to the tag and press Delete or Backspace.
Moving tags around (drag&drop)
You can move tags around by dragging and dropping.
Special symbols
The section Tags & Symbols includes different types of special space characters. They ensure that the translation maintains proper formatting, layout, and consistency with the source content. They are particularly useful when working with languages that require specific spacing or formatting rules.
- Place the cursor on the exact place of the target segment where you want to add a special symbol.
- Click Symbols.
- Select a symbol:
-
- Non-breaking spaces: Prevent line breaks between elements, such as in dates, numbers, or certain names.
- Four-per-em spaces: These spaces are narrower than the six-per-em spaces and are used in more specialized formatting, particularly in languages or contexts that require precise spacing.
- Six-per-em spaces: Wider spaces that are typically used for specific typographical purposes, such as in certain punctuation rules.
Format group – bold | italic | underline | superscript | subscript
The Format group provides options to change the style of words or characters.
To apply formatting:
- Select the text
- Click the desired format (e.g., Bold, Italic, Underline, Superscript, or Subscript)
Segments group – Join & Split | Copy source | Clear | Confirm all | Go to
The Segments group includes tools to manage and edit segments.
Join with previous segment
Combines the selected segment with the one before it for better context or to restore a phrase that was unnecessarily divided.
- Select the segment.
- Click Join with previous.
Both source and target content are merged into a single segment.
Joining segments helps create a clean translation memory with complete pairs of source and target language sentences instead of just fragments.
Split segment
Divides a single source segment into two parts. This feature is particularly useful when the source segment contains multiple ideas, sentences, or clauses that need to be translated separately.
- Select the source segment you want to split.
- Place the cursor at the split point.
- Click Split.
When splitting a segment, the target text duplicates in the new segment.
Copy source to target
If the target segments should be identical to the source, you can copy the content from the source to the target. Similarly, if a source segment contains numbers or characters that are prone to typing errors, copying the entire segment into the target lets you translate around those elements more safely.
- Select the target segment to which you want to copy the content of the corresponding source segment.
- Click Copy source.
Note: Existing target content will be overwritten. This includes confirmed segments; the source will overwrite any existing text. Be sure to check if you really want to replace the target text with the source.
Clear target segment
Removes all content from the target segment.
- Select the target segment you want to clear.
- Click Clear.
You can also clear the segment text by selecting all the text (left-clicking on it three times) and pressing Delete.
Confirm all segments
Confirms all segments in the file.
Click Confirm all in the workspace toolbar to confirm all segments. After clicking this button, a window will pop up in which you need to confirm by clicking the Confirm all segments button.
As a subvendor, you may not see this button as its visibility depends on the job’s configuration.
Go to segment
umps to a specific segment by segment number.
- Click Go to.
- Enter the segment number.
- Click Submit.
- The view changes to the selected segment.
Sources group – Google | Linguee | Assistant | OpenAI | AI Worker
The Sources group provides quick access to external resources and AI-powered tools, such as Google or Linguee, call up termbase’s AI Assistant, OpenAI text improvement options and the AI Worker window in order to edit its configuration.
Opens a browser window with Google search.Linguee
Opens Linguee in a new window for bilingual dictionary and translation examples.Assistant
Opens the built-in AI Assistant in a panel on the left side of the screen.
OpenAI
Provides AI-powered text improvement options:
- Rewrite
- Shorten
- Plaintext
- More entertaining
- More formal
- Fix spelling
- To change the whole segment, place the cursor in that segment; otherwise highlight the text within the segment you want to change.
- Click OpenAI.
- Choose an improvement option from the drop-down list.
File group – Export | Finish file
The File group provides options to export your text and complete your workflow.
Export
You can download either the source file or the current version of the target file:
Download Source: Exports the original source file used for the job.
Export Target: Exports the translated file with its current content from the workspace.
Finish file
Marks the file as complete and ready for delivery or review. Before finishing, ensure that:
- All segments are translated
- All segments are confirmed
- No untranslated or pending segments remain
- All edits and revisions are complete
Click Finish file to mark the file as finished. A confirmation window will appear. The system will:
- Notify you of any errors and direct you to the Quality Report, or
- Display a summary of edited and confirmed segments
Recommendation: Resolve all errors before finishing the file to avoid issues during file export.
Information bar
The Information bar is located above the Segment table and shows key details about the current file.
The details from left to right:
- Job name and file name;
- number of unsaved segments;
- number and percentage of edited segments;
- number and percentage of confirmed segments;
- number of selected segments.
Segment table
The Segment table is the main workspace where you view and edit source and target segments.
Side-By-Side View
The File translation workspace displays source and target segments in two columns for easy comparison and editing.
- The source segment appears on the left
- The target segment appears on the right
Click any segment (source, target, or information area) to select it. The cursor automatically moves to the target field for editing. If a segment is already selected, you can click specific areas within it to perform additional actions.
Symbols within segment table
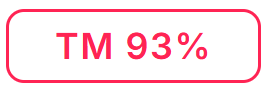 |
The TM symbol indicates a match from saved translations, and the percentage shows how closely it matches the source segment. |
 |
Machine translation quality estimation score that gets generated by the MTQE AI Worker. The explanation for the score is found in the comment section of the project. |
 |
The symbol indicates a cross-file repetitions, meaning the same content appears more than once across files in the project. |
 |
The symbol indicates that this segment appears several times within the current document. |
 |
The symbol indicates that this segment contains terminology. Within the segment, the term is underlined green.
|
  |
These symbols indicate if the segment is locked or unlocked. A locked segment can be excluded from reworks by reviewers or AI workers. |
 |
Segment not confirmed. Clicking on the pencil symbol will confirm the segment as translated/reviewed. |
 |
Segment confirmed. |
 |
Segment saved. |
 |
Segment not saved. |
 |
Number of revisions. Click on the symbol to view the rework log for this segment.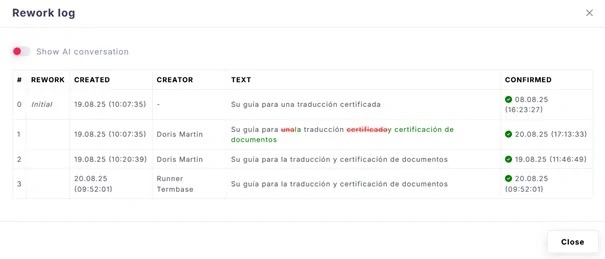 |
 |
This symbol indicates that there is a comment attached to this segment. |
 |
Quality message. Clicking on the symbol with open Quality messages and Quality report tabs in the sidebar. |

Sidebar
|
Icon |
Function |
Meaning |
 |
Job | Details of the project |
 |
Guideline | Guideline integrated in the project |
 |
Additional files | Reference files in the project |
 |
Terminology | Terminology matches in the current project
|
 |
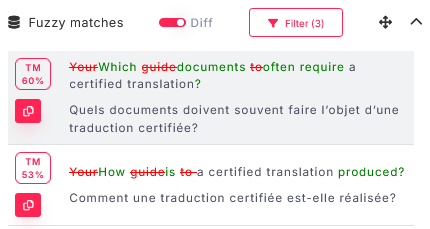
Fuzzy matches | Matches from the saved translations (translation memories)
With a toggle Diff, the difference between the saved translation and your current translation unit can be shown
|
 |
Concordance search | Keyword search in recent projects and saved translations |
 |
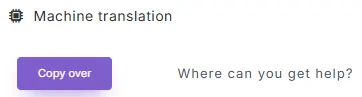
Machine translation | Machine translation results
|
 |
Comments | Section where automated AI workers leave comments (e.g. quality estimation) and where a reviewer can add a comment |
 |
Quality messages | 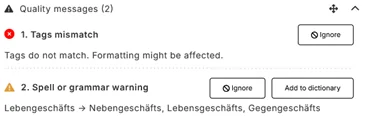 |
 |
Quality report |  |
 |
Live preview | Preview of the original file |
 |
Analysis report | Statistics of the word/character count, saved translation matches and automatic translations
|